How to Make a DIY Car Wash this Summer for Super Cheap

DIY, Motherhood

316234_154034104779051_1934471763_n

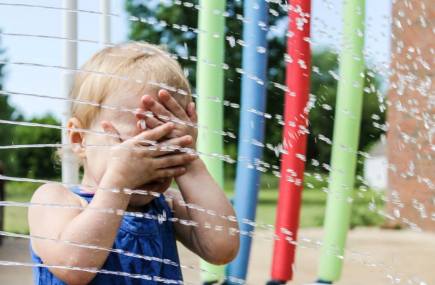
I posted a silly TikTok with our DIY carwash and several friends wanted to know how to make their own! I originally did this a couple of years ago when I was first getting into photography and absolutely loved the way the photos turned out. It’s a super fun mini session to offer during the summer months, and fun for all the kiddos. It’s not super expensive, and right now when it’s hard to find a pool filter…it’s a great way to be able to enjoy going outside.

Supply List:

  • (9) 1″ elbows
  • (7) 1″ tees
  • (2) 1″ crosses
  • PVC Hose Adapter
  • (20) 1×30″ pipe
  • (3) 1×37″ pipe

Making the Frame:

  • Lay two of the 30″ pipes on each side (parallel to each other, using 4 pieces of 30in pipe so far). You will then connect the pieces with tees in the middle.
  • You will put elbows on the ends of three pipes, and a tee on one end. The tee is what you will connect your PVC Hose Adapter to later.
  • Once connected, add 6 of the 30in pipes vertically (three on each side). In the front and back of your car wash frame, put a tee on each of the vertical 30in PVC pipes.
  • You can go ahead and add the cross sections in the middle vertical pieces if that makes it easier.
  • In the front and back of the carwash fram, add 4 pieces of 30in pipe vertically and use a tee and a 37″ pipe horizontally to connect them at the top. This will complete almost everything but the middle section of your frame. For your cross fittings, you will put them in the middle section of the car wash on both sides (if you haven’t already, I waited until this step).
  • Once you have the cross fitting on each side, add two 30in pipes on each side of the car wash to connect the sides laterally (four pieces in total).
  • Add 30in pipes on both sides vertically (middle section only, so 2 peices), and use an elbow on each pipe to connect the 37in pipe at the top. This will complete the middle section of the frame.IMG_8436

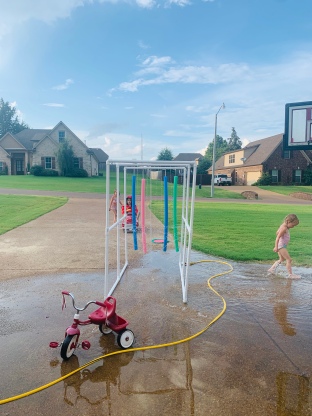
How to get the water to flow:

You are going to drill holes about 1in apart (this does not have to be exact). We used a 1/16 drill bit to make the holes. Attach a standard water hose to the front of the car wash by using a PVC hose adapter connected to a tee.

Completing your Car Wash:

Gather up pool noodles, sponges, plastic streamers, etc. I grabbed little spray bottles from Target that were about a dollar. I got them from the Beauty section one year in bright colors. I got sponges from the dollar store and hung them from the car wash. Pool Noodles can be combine with streamers so that you don’t have to purchase as many noodles. Another suggestion for truly making this a DIY project is cutting floats that have holes in them to make plastic strips. You can also use plastic table cloths to make your streamers. Just cut them into pieces. We also used a leaf blower as a “dryer” for our car wash at one point, ha. 

Have Fun:

Grab your scooter, coop car, box car, or just run through the car wash like a sprinkler! Wash your cars with sponges. Bring on your best pretend play! This will occupy your kids for hours! Splash in puddles, grab rain boots. The possibilities are endless with this DIY summer hack!

Optional Ideas:

Make a sign in front of your car wash and teach your kids about running a business. Talk to them about what is going on in the world right now and how being resourceful is necessary.  I like to use everything as a fun learning opportunity!

Let me know if you found this helpful. Feel free to follow along for more DIY hacks, budgeting tips, parenting reads, and more. I post daily on IG also. @ashleeleighann

-The Zombie Mom


Dear Alyssa…Do you Really Have to Grow Up?

Motherhood

Dear Alyssa,

You like to remind me every day that it’s getting closer and closer to your 9th birthday. Birthdays are a time to celebrate, and you know that I find any excuse to throw a big party and have all our friends together. But then I reflect on the last year of your life, and it’s always bittersweet. Something about the fact that you are almost T E N is really not okay with me. I know this year hasn’t been the best, but to be honest you probably think that it has. I hope you never lose that light you have to offer the world. You really are something special.

You’re a dreamer. You get that from me. I hope that you never waste time viewing that as a flaw or trying to fit in.

Thank you for telling me it was okay so many times when it really wasn’t. Thank you for seeing the positive in every situation and finding the beauty in this ugly world. I am so proud of you for fighting through your fears. You handled all the struggles of this year with grace, sometimes much better than I could as an adult. Thank you for believing in me when I didn’t believe in myself. I hope that you look back at this time and know that everything I did was to protect you.

You’re such a cool kid. I’m not even saying that because you’re my kid. The fact that you still want me to pick you up, spin you around, and “squish” you at almost nine years old makes my mama heart so happy. Your Pokémon pajamas, desire to learn everything possible about sharks, and your independence make me so proud to be your mom.

You know that dance parties require 90s music, that the only way to cure a broken heart is by eating a Snickers ice cream bar, and sprinkling glitter everywhere is just a part of life.

I know it won’t be like this forever. This past year you have learned to play violin, found a love for reading, and gave the best dang soldier performance during the Nutcracker that I’ve ever witnessed. You are so intentional with everything that you do, and sometimes I really do love you so much that it hurts.

You find the best in people, even when they really don’t deserve it. It used to worry me, but after this past year I’ve realized that the world needs more people like you.

Sometimes people need just a little bit of your magic. I know that your smile, despite the worst of odds, made me commit to becoming the best version of myself. It’s not fair. It’s not right. And it’s not okay in any sense of the word, but you made me so proud to be your mom by showing everyone what you are made of. Never stop standing up for what is right. You are your only limit, baby girl. I truly believe you can do anything you set your mind to because I’ve watched you do it. I watched you pick up your violin and play when all you wanted to do was hide under your blanket.

I want you to know that I support you. I love hearing all your dreams and no matter how exhausted I am, your energy gives me life. You love to create, and I am so blessed to call you mine.

So many people have told me that kids are resilient, like you can just move on and forget about the trauma you’ve been through. They’re right in a way. You have shown so much strength. But you also have the biggest heart, and you understand things that an eight year old should have no clue about. Sometimes you’re the only adult conversation I have all day. You’re an empath, like me. I want you to know that it’s not easy for me to leave home at night when I know you need me there to feel safe. But I get to spend my days watching you grow.

There have been so many positives this year. You had your first dance recital, you played basketball and had nerf wars. You went to Mexico and swam out in the middle of the ocean and slid down a slide into the water. You jumped off cliffs into the lake. You drove your scooter to your friend’s house all by yourself. You learned your multiplication facts and read your first chapter books.

I won’t ever be ready to see another year go, but I am always up for a new adventure.

Love you allllllll the way to the moon and back,

-The Zombie Mom

How a Room Makeover can Change Everything with DIY Tips

DIY, Mental Health, Motherhood

Back in December, my daughter went through a very public trauma. Our lives were completely turned upside down, and while I can’t go into the specifics of that right now, I can say that her doctor recommended a room makeover for her bedroom. I have four girls. The older three chose to share a room, and before this happened they basically just slept up there and played in the playroom downstairs. I loved having a simple, clutter free space for them to sleep at night. This made cleaning soooo much easier as toys everywhere drives me nuts, BUT it’s super hard to avoid with four kids.

First of all, this kind of wrecked us all emotionally and it was right at Christmas. We had definitely seen better days financially, but you do what you have to do for your kids, right? Alyssa is usually extremely happy, talkative, and has no trouble sleeping because she’s like the energizer bunny all day every day.

Picking the Theme: I wanted something bright with happy colors. My daughter is super obsessed with space, and the younger two really like unicorns, and everything Jojo. It took some time, but between Target, Amazon, the Dollar Store, and Lowe’s we were able to combine this theme and didn’t spend very much money! So here goes!

Glow in the Dark Stars and Twinkle Lights: I ordered these on Amazon and they were very inexpensive. The twinkle lights came in a pack of 6, and we hung them behind her pastel rainbow colored curtains that I’ll get to later. I also picked up a few extra strands of twinkle lights at the dollar store. I pinned these to the higher parts of the ceiling to keep my younger littles from pulling them down.

For the glow in the dark stars, I used spray adhesive to make sure that they stayed on the wall. They came in multiple colors, which really helped with combining the themes of space and unicorn/whimsical. The stars do come with a sticky back, but it took some time to put hundreds of stars on the wall so I only wanted to do this once.

Paint: I love getting Valspar paint samples from Lowe’s. There are always multiple colors to choose from. I used a bright blue, pink, and purple. The samples are less than $5 a piece, and one sample of each color was enough to complete my project. I painted one wall a dual toned blue and pink, and another wall blue, pink, and purple .

For the dual toned wall, I just used painters’ tape to make a line, and since there was nothing (like a bed) going against that wall, I used the glow in the dark stars to make the separation blend a little better.

For the galaxy wall, I painted a spot blue on the wall, and started blending other colors with a grocery sack. I watered the paint down just a little bit since it is pretty think.

Curtains: I got the curtains on Amazon. They are blackout curtains and this was important since I wanted my daughter to feel secure in her room again. These were such a great choice for the focal point of her room and I loved these colors even more in person.

Bedding: Since I have three girls, originally I wanted to get three different color bed spreads, but it was messing with my OCD too much. I ended up purchasing two pink bed spreads and a white bedspread with pops of purple, pink, and blue for my oldest daughter. Her bed is in the middle so it turned out super cute.

Hanging Stars: A couple years ago, I got these huge gold stars from Dollar Tree. They are actually Christmas ornaments, but they look super cute and sparkly (perfect for a little girl’s room(. I picked up a few more white stars at Target (these were also ornaments). I used ribbon that I already had at home and hung them from the ceiling.

I wanted to get the girls a doll house for Christmas and I spent hours looking for the perfect one. I love DIY projects so I thought about fixing up and older dollhouse, but I became obsessed with this one. I watched for sales and got it for about half price closer to Christmas. If they were going to have toys in their room, I wanted them to be cute.

Playhouse/Reading Loft: We had extra wood laying around the garage, so my husband put it together to make a fun reading space for the kiddos. There is a little bookshelf, and the kids grab sleeping bags, blankets, pillows, stuffed animals and whatever else they can find to hang out in there. Alyssa chose some books about space since that’s where she found comfort at the time.

I changed everything about their room, from where their beds were placed, colors, bedding…everything. My aunt and cousin helped out so much and I will forever be grateful. This was at a time when my oldest wasn’t able to sleep at night. I am so glad that she has regained a sense of normalcy through all the chaos.

If you don’t like your story, change it. Don’t just go through it, grow through it. And remember that it takes a village. We are all in this together.

Thanks for following along on our journey!

I hope you found this helpful. If you have any questions, feel free to reach out!

-The Zombie Mom


How to Make a Super Fun Summer Obstacle Course for Cheap!

DIY, Lifestyle, Mom Life, Motherhood

If this is your first time here, Welcome! I’m a mom of four girls who works night shift as a laboratory scientist. I homeschool my girls during the day, and I’m constantly trying to come up with new ideas to stay awake all day (while showing my girls the beauty in life). Corona has us all going a little crazy cooped up in the house, right? I planned to blow up the girls’ unicorn sprinkler and let them run around in the front yard, but it had a hole in it. It was way too hot to have a day outside without water so we improvised (which always does end up in the best day ever in my experience).

When we purchased our house, our realtor brought us over a moon bounce the next day!   There were five kids, infant to age 8 so to make this day fun for everyone would take a little work. Most of what I used were just items that we had in the garage. We had a smaller moon bounce/inflatable that served to keep the younger kids occupied while the older kids completed the course. The smaller inflatable was purchased second hand for super cheap.

While the moon bounce was a fun touch, it’s really not needed. This was the end of the course, and everything else leading up to it would have been enough. Here is what I used! Let’s get started!

Toys Used:

  • Two Peppa Pig Trikes (obviously don’t have to be peppa, but the trikes being small made it harder to peddle haha)
  • Hula Hoops
  • Kiddie Pool
  • Baseball and Bat
  • Pop up tent/tunnel
  • Bubbles
  • Water
  • DIY slip and slide (instructions provided)
  • Two Inflatables

Rundown of the Obstacle Course: First, the girls each had to peddle on the tiny trikes to the hula hoops. Once they picked up the hula hoops, they had to hula to the pineapple float (these fun floats were purchased from Target for about $3, I had a Flamingo also). Next, they had to slide down the slip and slide, crawl through the tunnel (pop up tent) and run to the kiddie pool. Once in the kiddie pool, they threw a ball in the air and hit it with the baseball bat. The final task was to run to the moon bounce, and climb to the top of the “wall” in the middle.

Tip: I added water, soap, and bubbles inside of the moon bounce so that it made it harder to get to the top at the end!


How I made the slip and slide: You can made this with any thick plastic. I used an old inflatable ball pit that had a hole. I cut it, spread it out, and we put two plastic stakes to hold the plastic in place. You can obviously make this bigger, but since it was just part of the obstacle course, it was the perfect size. You could use old pool floats and if you don’t have anything laying around, a hardware store sells rolls of thick plastic. Another tip to make it extra slippery would be to add dish soap.

Mom Tip: I like to make everything a “game” or “challenge” to keep my oldest interested. It didn’t really matter who finished the obstacle course first, but giving her tasks to complete is also a learning experience. Having ADHD myself, I know how engaging challenges can be and how I can let time slip away from me quickly without even realizing it. Escape Rooms and Obstacle Courses are along the same lines as video games and I have found this extremely effective when learning new topics.

Let me know if you found this helpful! Feel free to follow along for more DIY, life hacks, mom life, mental health, fitness tips and everything in between. 

-The Zombie Mom